Halloween 2009. Game on!... to figure out what the kids wanted to be for Halloween..Stephen was only five and one of the things he loved most at the time was ice cream. I thought maybe an ice cream sundae costume. I ran it by him and he was excited! Next on the agenda...a little "recon". I scoured the Internet for ideas and came across a costume on pottery barn. Except it was a cupcake,but it gave me the thought of how I can put my own spin on it. It was a big hit!
SO HOW DID I DO IT???
EASY.....A PILLOWCASE, FELT, PAPER MACHE, A WHITE BASEBALL CAP, COLORED FOAM PIECES FROM THE CRAFT STORE, A FOAM BALL AND A LITTLE FIBER FILL.
...AND HERE IT IS ***** NO SEWING***** FABRIC GLUE IS THE BEST THING SINCE SLICED BREAD!!!!
HERE ARE THE STEPS..
1. regular white pillowcase ( I got mine at a thrift store for $0.99). cut a slit on the sealed part of the pillowcase for the head. Also, a slit on each side for each arm
2. I bought a few yards of felt (white,brown,,pink,off white and grey)(marshmallow,chocolate,strawberry,vanilla,and grey for the dish)
3. Next I cut each color(except the white felt) into the shape of a scoop of ice cream and grey into the shape of a dish. 2 pieces each color for the front and back.
4. Next, I fabric glued each piece to the pillowcase (one piece each side, front and back) leaving a small "pocket" open under a few of the "scoops" to fill it with fiberfill. This gives the scoops a little more volume.
5. I then took the fabric glue to seal the scoops together.
6. For the marshmallow, I cut the shape (dripping down the sides), out of white felt. I then slit a whole in the middle to slide it over the hole in the top of the pillowcase. Then I glued it to the top of the pillowcase.
7. Next, glue the small pieces of colored foam onto the marshmallow for the sprinkles.
8. For the "CHERRY ON TOP" I took a foam ball covered it in paper mache(I bought pre- made paper mache from the craft store..just add water..)Let it dry, painted it red, and glued it to the top of the hat. Just grab a branch from your back yard for the stem and TADAH!!! A COSTUME IS BORN!!!
The most important thing when making any costume is to have fun! Don't be overwhelmed because it doesn't have to be perfect! It's a great time to have fun and be creative with the kids. Don't forget to use your coupons and thrift store finds. This costume cost about 15$ dollars to make and the memories it made were PRICELESS!!!!! HAVE FUN!!!
Last year, was a big year for our family. We were fortunate enough to plan a huge trip to Disney during the week of Halloween. We surprised the boys the Morning of our departure,October 30th. They were in disbelief! It was the best "Dream come true" moment for me. Keeping the trip a surprise was exciting yet exhausting. I was trying to keep Halloween at home just the way we usually do. Busting out the decorations full throttle, costume parties, pumpkin carving, etc. All the while, packing, planning, checking and rechecking our itinerary. Well, it came off without a hitch and we had the best vacation ever!!!!
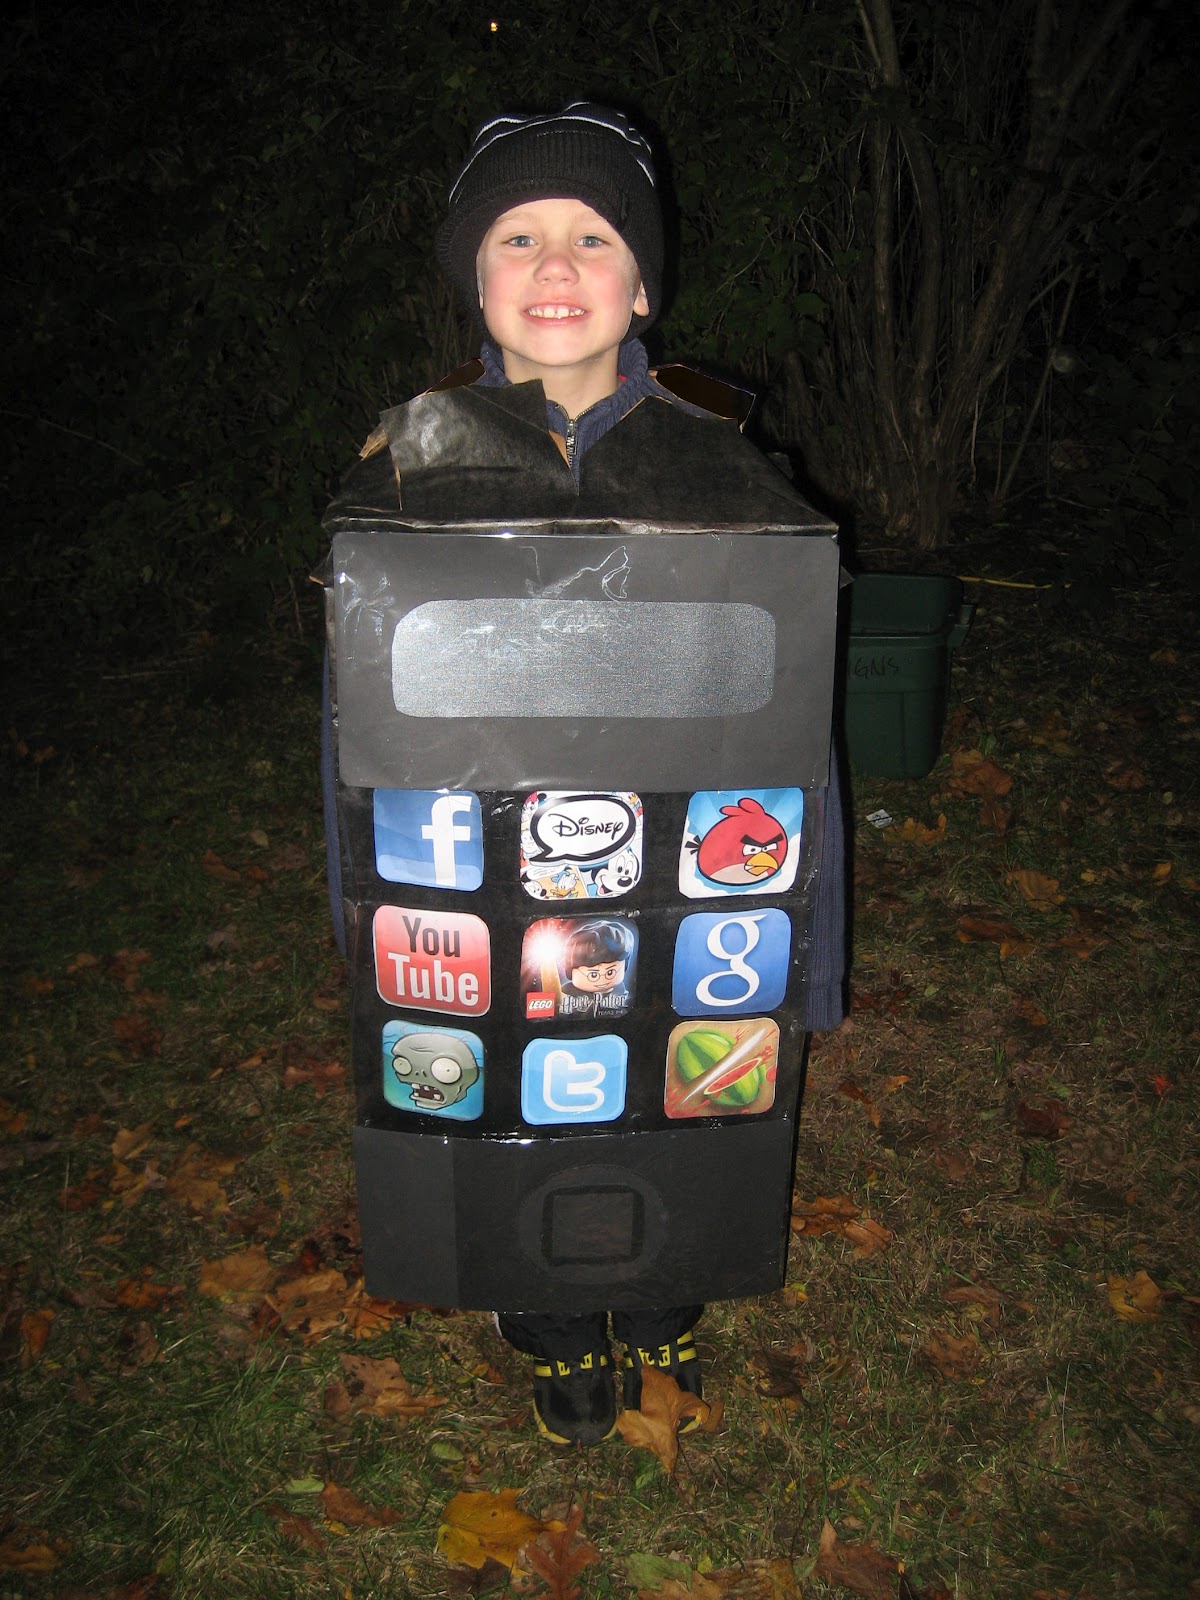
While getting ready for Disney, we had planned out the costume that my 8 year old son wanted to be for Halloween. Final verdict...Yes....the I Phone. Great idea, inexpensive and fun to make. Here are the steps to create this fun costume.
- First, buy a pack of lawn and leaf bags. Sold almost anywhere,especially hardware stores.
- Next, unfold one bag,open it and place it outside to spray paint. ( I placed it over a planter pole in order to paint the entire bag.)
- Make sure you spray a few coats of spray paint onto the paper bag and let dry in between coats just to make sure any logos on the bag are fully covered.
- Next, choose which images you would like to make for your "Apps". My son chose several that he liked and of course I insisted he have a Disney App! I copied each image and sized them accordingly. I wanted to have enough for 3 rows(Aprox 4-5 inches square).
- After printing all my "Apps", I glued them to a second piece of paper and cut them individually.
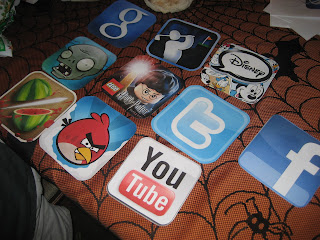
- For each "App" I glued a third piece of black construction paper (on three sides..to make a "pocket"). Then I glued each "App" to the painted lawn and leaf bag.***This sounds like many steps but it is really easy!!!***
- This is the fun part...each "App" lights up!!! I put a small glow stick into each pocket on Halloween night.
- To finish the costume, I cut out the shapes for the power button and of course the apple and camera lens on the back of the costume. For a finished look, I placed clear wrap over all the apps to make the "screen" shiny. I made a cross slit on the top of the bag and a smaller single slit on each side of the bag for his head and arms.
LET ME TELL YOU, HE WAS TURNING HEADS AND MAKING PEOPLE SMILE ALL NIGHT!!! EVERYONE LOVED THE COSTUME, ESPECIALLY MY SON!!!!
OK, so it's been a long, long while since my last post. I think it's because I am a fledgling blogger who would like to create a really great blog and am feeling a little overwhelmed . It's learning how to balance and I don't think I have mastered the art of it yet. I think about it all the time. How do I balance being a wife, mother, and a nurse(working 30-40 hours weekly) while volunteering, hosting play dates, maintaining a household,keeping up with friends and trying to create great projects to share with the blogging community. ( I am exhausted thinking about it:| ! )
The answer.....I just have to dedicate the time like everything else I do. Half an hour every night (or at least a few days a week) should start me on the blogging path. There are just too many great ideas that I would like to share with everyone. Especially in this time of economic crisis, I have some inexpensive ideas to make your Halloween fun and affordably creative!
Due to an illness in my family, I haven't been able to post for a while. Now, I am up and running!!!
Halloween is fast approaching and the parties are fast and furious.... Here are a few tips to help things go more smoothly...
- ALWAYS....use a coupon! Whatever craft store you are in, there should always be a coupon to use for your purchase. NEVER pay full price!
- Shop for decorations and costumes at your local thrift shop..Keep your mind open because ANYTHING can be transformed into something else.(I have found different candle holders and spray painted them black to place on my Halloween mantle.)
- The hardware store is also a great place to shop for costume pieces and accessories! (Spray insulation foam in neon green works well for a "witches brew".)
- I get inspiration for many ideas through magazines, the Internet etc.. just put your own spin on them!
- When the Halloween season ends...make sure to hit the "day after" sales for the best bargains on costumes, paper products, decorations..etc... and save them for next year. Many stores slash prices to 75-90%OFF. I just can't pass up a good deal!
- Look around your house inside and out to "re-purpose" materials you already have. (for example, small rocks put in a glass jar can be labeled "Goblin Hearts". The children get a kick out of looking for them and imagining what they could be!)
- So many ideas! Most Importantly, have fun and enjoy this season with your family and friends!
It seems earlier and earlier every year that the stores put out their Halloween decorations and costumes on display. With that ,comes a hefty price tag as well. In light of the economy these days, it would seem impossible for some to get into the "spirit" of Halloween without dropping some serious cash! However, I hope to let you in on some tips and techniques to make your Halloween fun, exciting, creative and affordable!
I have always loved Halloween since I was a little girl. The idea of being able to transform into a different version of yourself by using your imagination and creativity has always been fun for me. Now that I have children, I have shared this tradition with them. Every Halloween is an adventure and an opportunity to let our creative juices flow!
After seeing all the Halloween items in the stores, my sons start talking about what they want to be for Halloween. Over the years, I have made costumes such as an ice cream sundae, Willy Wonka,a headless waiter, bobble head costume, and a "stick" figure just to name a few. Everyone that has seen these costumes has absolutely loved them...and the one common thing everyone says is.."I wish I could do that..I am just not "creative"." Well, you don't have to be "crafty" to create a costume or decoration...you just have to have fun and enjoy! It's great to work together with family and friends to make lasting memories!
Over the next few weeks, I will share tips and ideas for costumes and decorations that are easy, affordable and yes...simply SPOOKTACULAR!